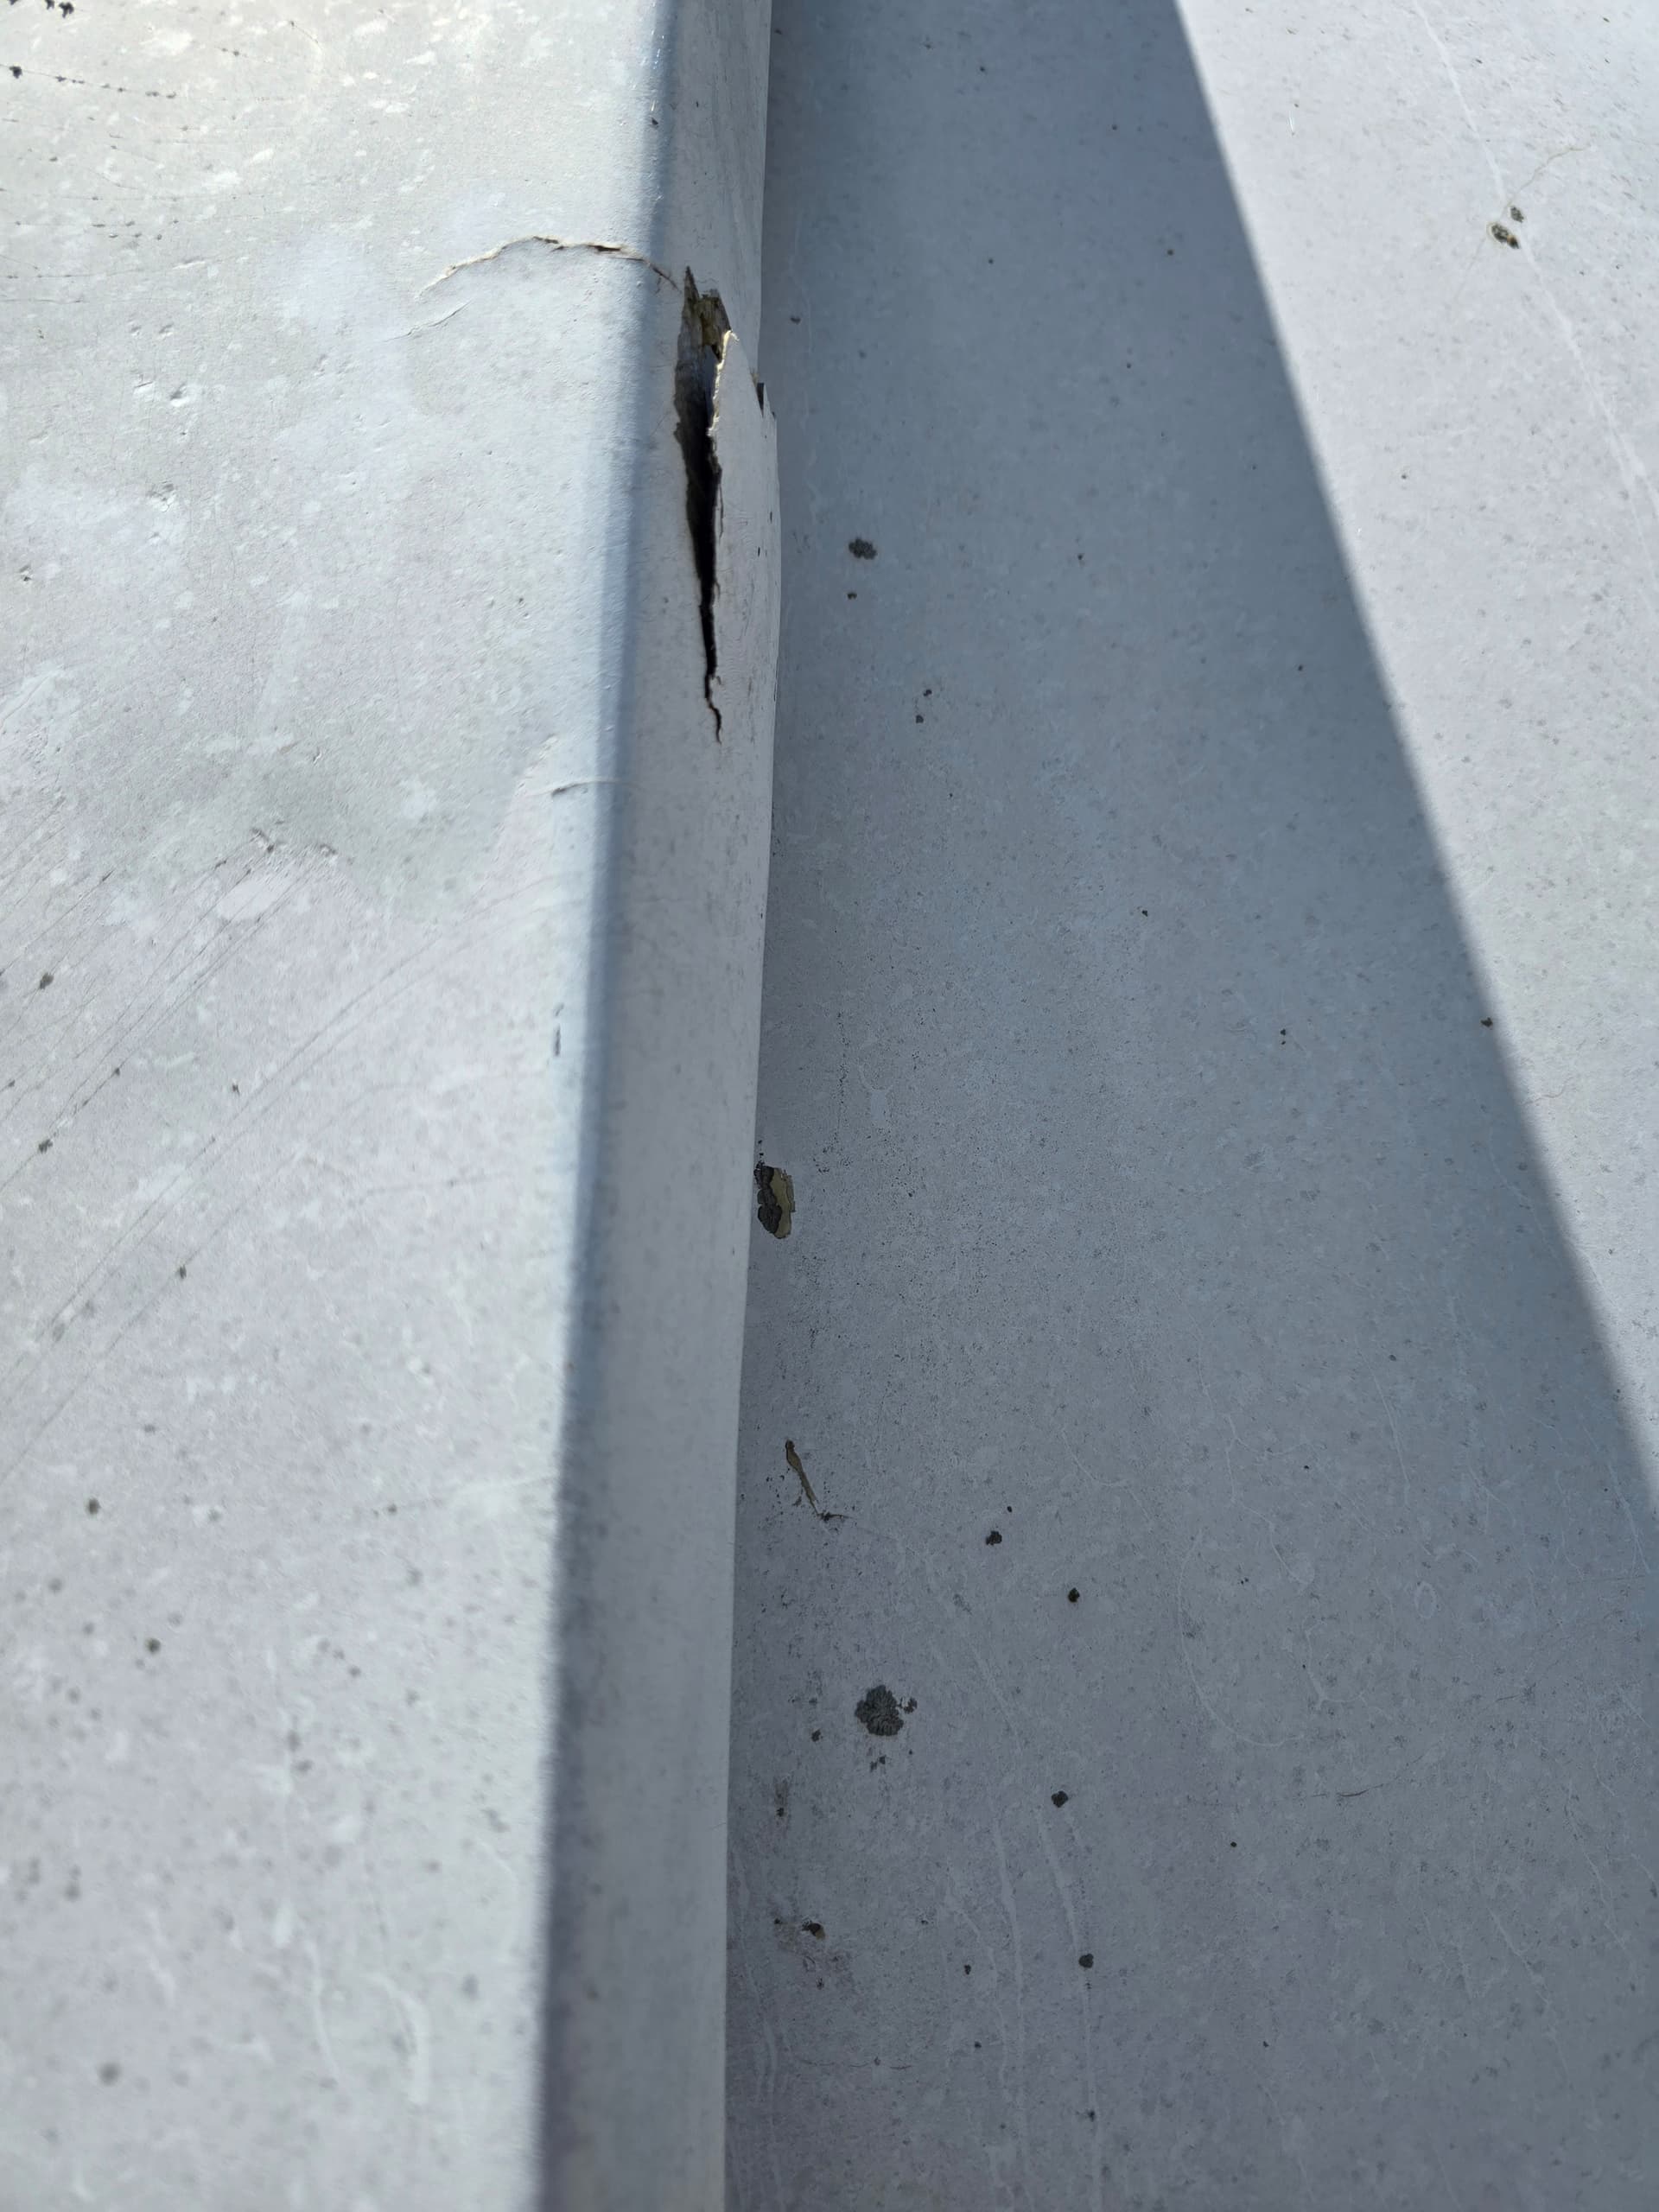
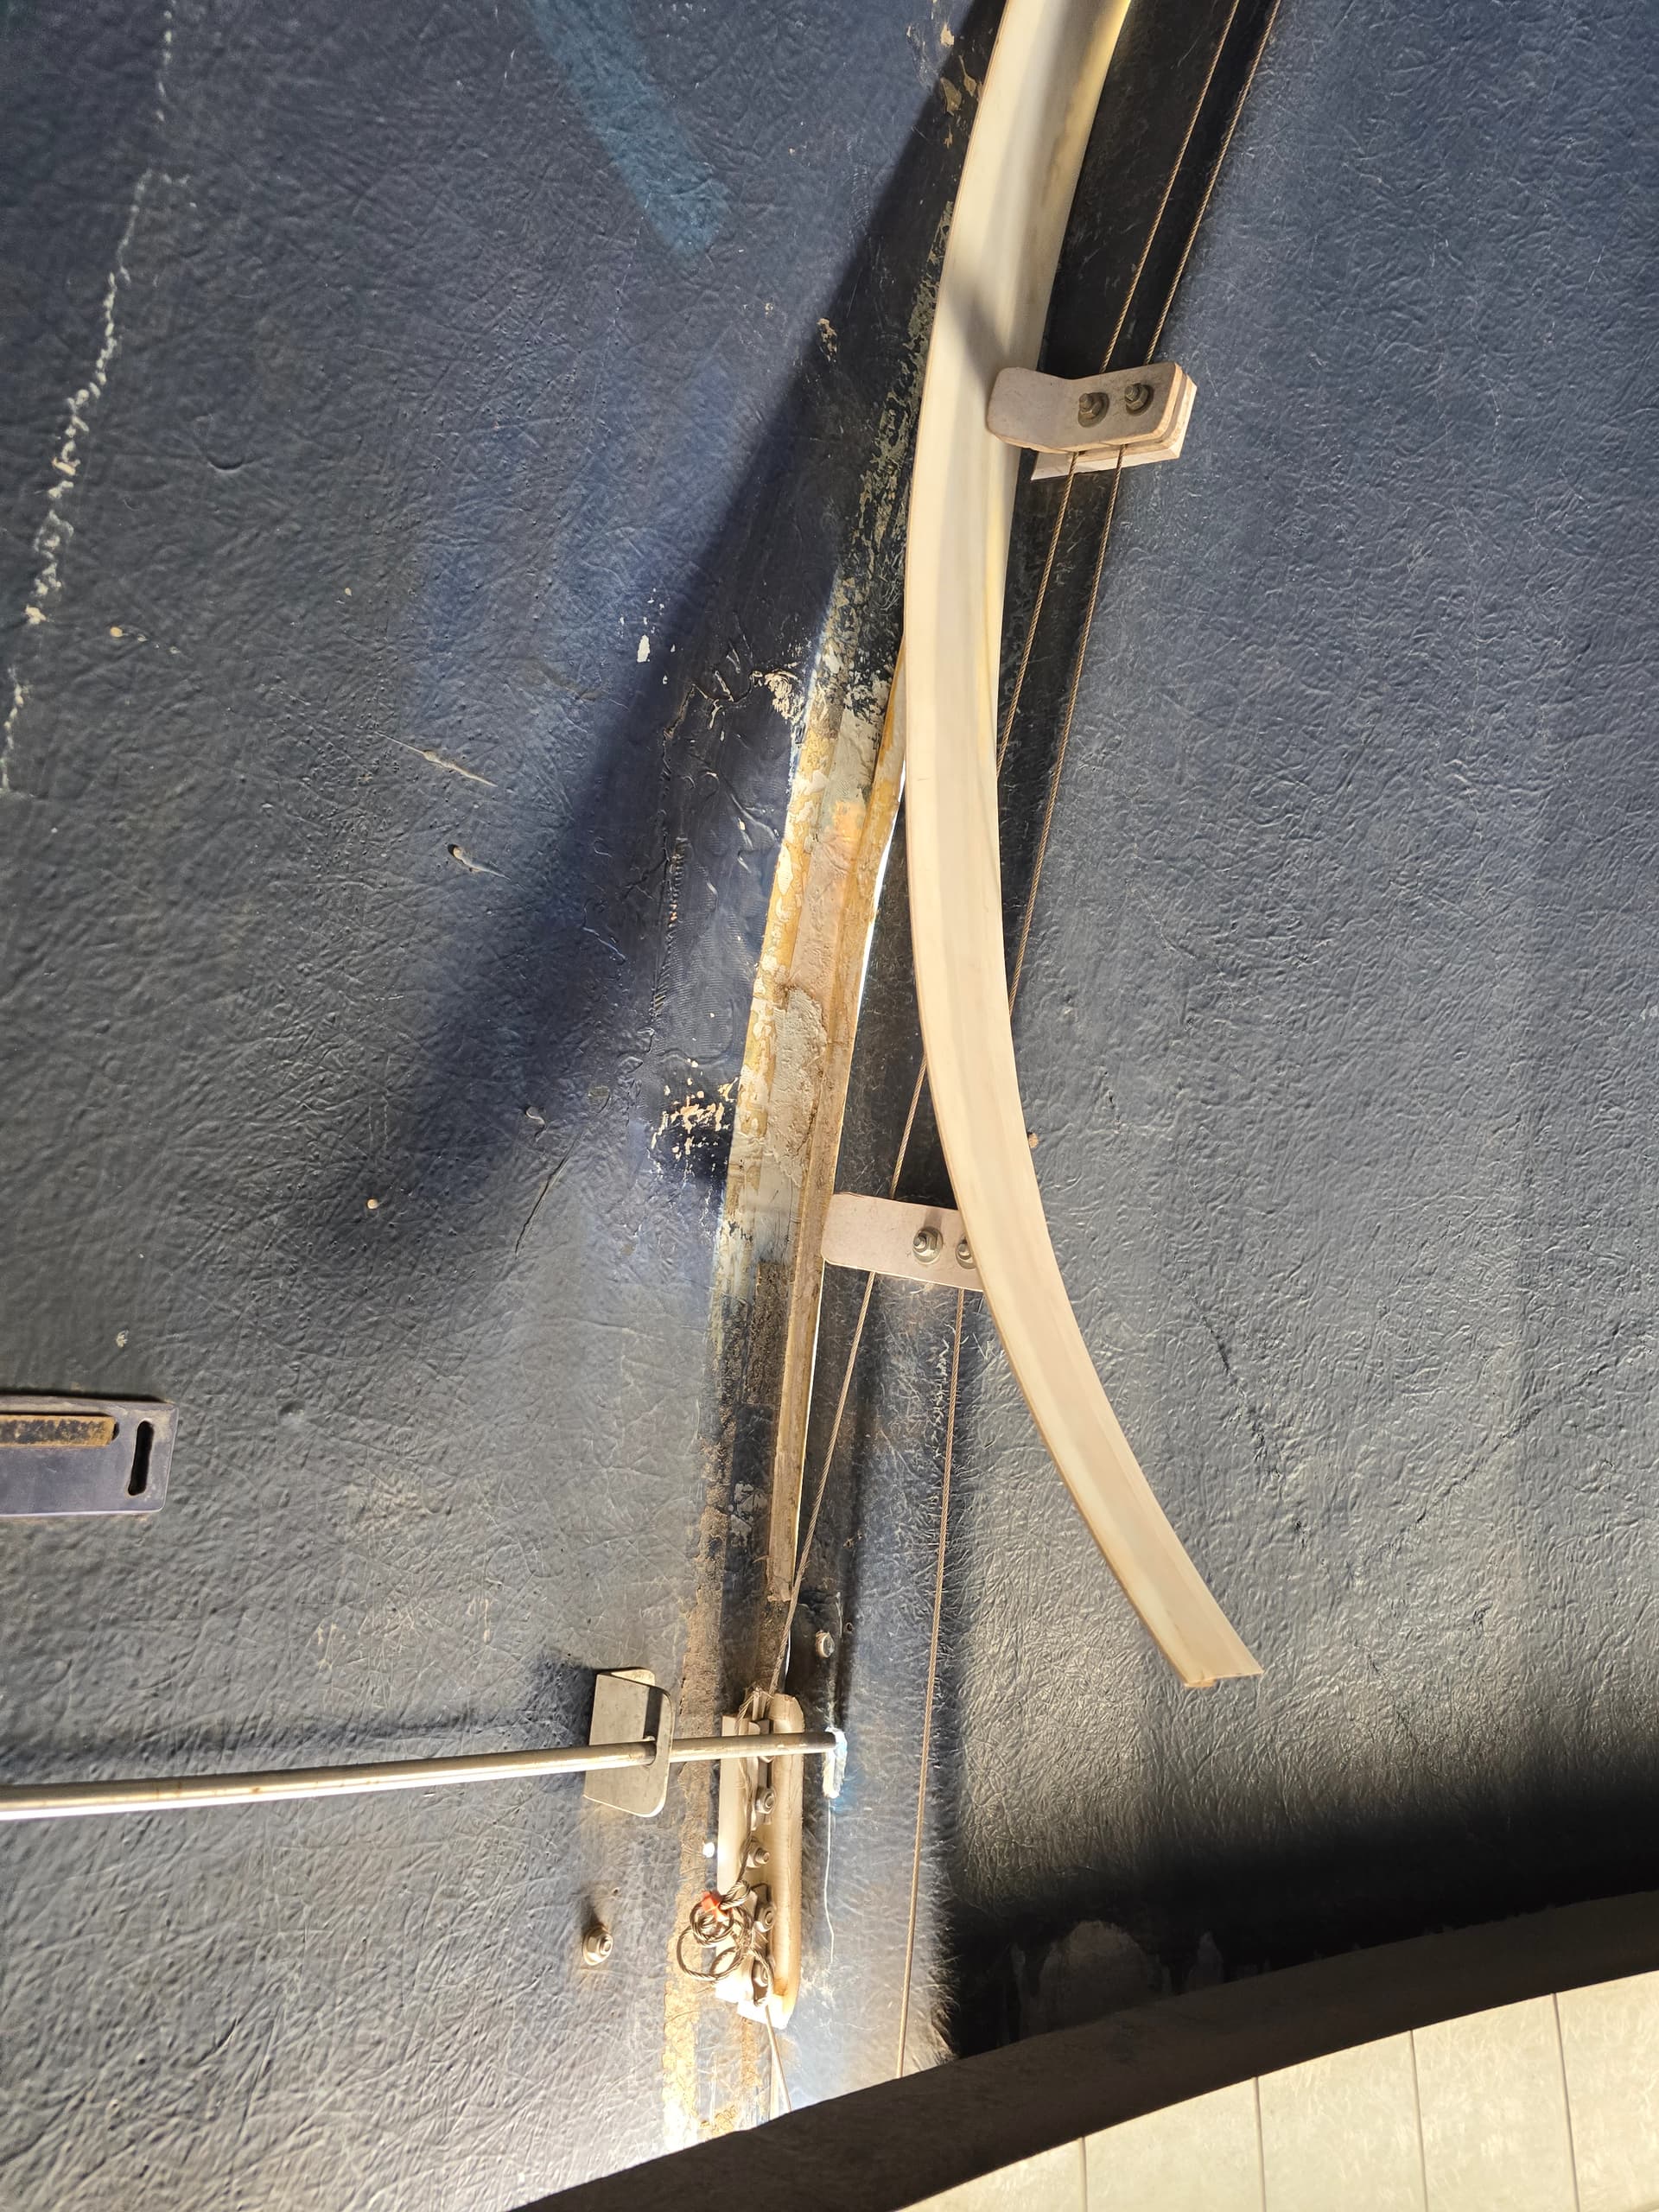
I was able to go out and take a look at the Pro Dome last weekend, One of the “low friction strips” have come loose at the bottom of the front shutter. We just need to reattach it with some double stick tape after preping/cleaning the surface. The bigger problem I noticed is some damage to the front shutter itself which will likely keep it from moving cleanly up and into the top shutter. The damage is at the edge of the front shutter and causes material to bulge out the side. It looks like the front shutter probably was stressed moving upward and might have flexed at that point and the material surface cracked and ruptured. This is not a new problem and that shutter has been repaired a couple of times before using a fiberglass repair kit (same as used on boats). Always something to learn in this hobby. ![]()
Thanks, Chris! Lots to do, I’m sure
Hope the Pro Dome is repaired for the member night.
New codes?
That is unlikely I am afraid. The fiberglass repair will not be easy, especially with windy days.
Heading out tonight to look at some things, but also to take a close look at the dome front shutter in advance of attempting repairs, possibly tomorrow. I have materials, just need to think things through.
The plan is to renove the front shutter, work on it, and then re-install after the repair has time to cure (about 2 days I think). I have a tarp to cover the opening, but I still want to wait till it can be done when there wont be rain or high winds for a few days.
I just saw your post on repairing the Dome opening. Did you figure out a time and date? Or did you already complete the repairs?
Sorry Marvin sir. If you have been looking at the weather, we need 3 or 4 days of decent weather so we can remove the front shutter, work on it, and let it cure before reinstalling. No opportunity to do that so far.
I’ve read about the Super El Nino that’s developing. I haven’t been out looking at the sky in so long I’ll have to clean the dust off of my scopes. Maybe June will be better than May.
No, it’s not going to happen until we can get several days without rain or high winds, and even then depends on my work schedule and timing.
If anyone in the club has experience with patching/repairing fiberglass, or more accurately, a fiberglass reinforced polyester resin, we could all benefit from your expertise! Reply here or send me a message.
mmabbottMember of the Oklahoma City Astronomy Club and CRO
I can be there 7/3. I’ll try and be there early, cause of the heat. Chris, were you going to work on the big dome closure or have you already worked on it? I could have missed the communications on that one.
I can not help you with that, other than to hold the parts in place for a time while the fiberglass hardens.
I can even deal with a little rain, as I have a tarp we could toss over the dome, but I don’t want to try and remove that shutter in wind - I am afraid it will get caught just right and torn apart.
I guess we could try rotating the dome so the shutter is facing away from the wind while getting it off, but working on it outside would still be tricky. Also, it will need to cure at least overnight, maybe longer if multiple layers of new material are needed after sanding down, and this is not an indoor activity.
Using AI (Claude) to research (this is an abbreviated version…)
The front shutter’s curved lower edge nesting into the dome aperture slot means the interior face at the damage site is essentially pinched against the dome structure when closed. That effectively eliminates the two-sided in-place approach.
Full Shutter Removal (Recommended for Best Repair)
The Pro-Dome shutter runs on tracks and is designed to be removable — it’s how the factory ships and installs it. For a 15ft dome the front shutter is substantial but it slides off the end of the track rails when fully opened. This is the only way to get clean two-sided access to the damaged edge.
What removal requires:
- Minimum 3 people — one stabilizing from inside the dome at the top, two outside managing the panel as it clears the track
- Scaffolding or a man-lift is strongly preferred over ladder work for a panel this size
- Rope and a ground anchor point to control the descent — don’t free-hand a curved fiberglass panel off a 15ft dome
- Once down, two sawhorses with carpet or foam padding let you work the panel flat at ground level, which is actually the ideal repair scenario
What you gain: Full two-sided access, ability to work flat, better laminate quality, and the ability to fully inspect the interior face for delamination extent before committing to the repair.
We will have to disengage the shutter from the cables first of course, which means going through a full re-tension and/or rewinding of the cables. I am hoping if we attach weights the the cables we can keep enough tension so the motor/clutch winding won’t come apart. The exact procedure for removing the shutter is something I still need to work out, but it looks like once the drive cables are removed, we may need to manually (with ropes) fully open the shutter so the top and front are resting on the back, at which point we can remove the top shutter and gain access to the front shutter behind it. I will reach out to Technical Innovations to see if this is correct.
Here is a timeline estimate, add a couple of days for re-installation and getting things adjusted. This looks like it will take over 1 week, and this will likely have to be spread out longer than that:
Some detail on the repair steps:
Interior Face First (Backing Patch)
Surface preparation — interior:
Using the angle grinder with a 40-grit flap disc, abrade the interior face 4 inches out from the crack in all directions. You’re removing paint, gelcoat wax, and contamination — you want bare, abraded, matte fiberglass with no sheen whatsoever. Feather (taper) the edges of the sanded zone rather than creating a sharp step. Wipe thoroughly with acetone, working in toward the crack. Let flash off completely — minimum 5 minutes. Do not touch the surface with bare hands after this point.
Open the crack:
Using a Dremel with a thin cutting disc or carbide tip, cut a shallow V-groove along the full length of the crack — open the crack faces to about 1/16" width and V-shape the edges. This removes loose material and gives the thickened epoxy paste a channel to fill completely. Blow out dust, wipe with acetone again.
Pre-cut patch cloth:
Before mixing any resin, cut all your patch pieces. For the interior backing patch, cut four pieces of 6 oz woven cloth centered on the crack:
- Piece 1: crack length + 3 inches each end, crack width + 3 inches each side
- Piece 2: add 2 inches to each dimension over Piece 1
- Piece 3: add 2 inches over Piece 2
- Piece 4: add 2 inches over Piece 3
Lay them out in sequence on a clean surface. Pre-cutting everything means you’re not fumbling with scissors while resin is going off.
Crack fill — thickened epoxy:
Mix a small batch of WEST SYSTEM 105/205 per ratio instructions, then stir in 406 Colloidal Silica until the mixture reaches a peanut-butter consistency — it should hold a peak and not sag. Force this paste into the V-groove using a putty knife, working it in firmly to eliminate voids. Slightly overfill the groove. Let this tack up — not fully cure, just lose its liquid state — approximately 45–60 minutes at 75°F before proceeding with cloth layers. This prevents the wet cloth from pushing the fill paste out of the groove.
Interior laminate patch — four layers:
Mix a fresh batch of unthickened 105/205. Working methodically:
Wet-brush the entire prepped interior surface with neat epoxy. While still wet, place Piece 1 (smallest) centered on the filled crack. Using a chip brush in a stipple/dabbing motion rather than strokes, work epoxy into the cloth until it’s fully wet-out — the cloth will go from white/opaque to translucent when properly saturated. No dry spots. Use the bubble-buster roller to consolidate the layer, rolling from center outward to push out air. Place Piece 2 immediately while Piece 1 is still wet — you want a wet-on-wet layup, not a cured-surface secondary bond between layers. Wet out Piece 2 fully, roll. Repeat for Pieces 3 and 4. The final layer should be well-consolidated with no air pockets — spend extra time with the roller on the last layer.
A squeegee or fiberglass roller works well for compacting the plies — plan on compacting the final repair patch as densely as possible while the resin is curing. Fibre Glast
Apply a sheet of peel ply (or wax-paper as a substitute) over the wet laminate and squeegee flat — this compresses the laminate, reduces air entrapment, and gives you a cleaner surface when it’s peeled off after cure. Leave peel ply in place until fully cured.
Cure — interior patch: Minimum 48 hours at 70°F before flipping to work the exterior. If you are doing a repair from both sides, wait 48 hours before working on the other side. Cover loosely with poly sheeting to keep dust and debris off during cure. Do not move the panel or allow it to flex during this window. Evergrip
Exterior Face Second (Structural Fill and Finish Patch)
After 48 hours, peel off the peel ply from the interior patch. Do the coin tap test again across the interior patch area — solid ring throughout confirms good laminate consolidation. Any dull spots indicate trapped air; mark them and plan to address from the exterior side.
Flip the panel:
With your crew’s help, carefully flip the panel so the exterior convex face is now up on the padded sawhorses. Re-verify that it’s sitting stable and not rocking.
Surface preparation — exterior:
Same process as the interior — 40-grit flap disc, 4 inches out from the crack in all directions, feathered edges, acetone wipe. The exterior face is your finish surface, so take slightly more care with the taper: a longer, more gradual bevel means the patch layers will sit closer to flush with the original surface and need less fairing compound later.
Pre-cut exterior patch cloth:
Cut three pieces of 6 oz cloth on the same staggered-size scheme as the interior, but sized one step smaller overall — the interior patch is carrying the primary structural load; the exterior patch restores surface integrity and adds supplementary strength.
Exterior laminate:
Same wet layup procedure as the interior. Three layers, wet-on-wet, bubble-buster roller on each layer. Peel ply over the top.
Cure minimum 24 hours before fairing work begins.
And finally the recommended materials:
Epoxy Resin (stronger repair, more forgiving)
- Epoxy has excellent thin-film cure characteristics, resists micro-cracking better than polyester, and offers 3.5–4.5% tensile elongation versus 1–2% for polyester — important for a shutter that flexes and takes wind load
- Bonds excellently to cured polyester substrate
- Epoxy doesn’t shrink, unlike polyester which shrinks 5–8% and can create stress concentrations at the repair joint
Buy list:
- WEST SYSTEM 105 Resin + 205 Fast Hardener (quart kit to start, have a second on hand) — ~$50–60
- 6 oz woven fiberglass cloth — 1 yard minimum (Jamestown Distributors or West Marine)
- 1.5 oz chopped strand mat (CSM) — 1 yard (for thickened fill backing)
- WEST SYSTEM 406 Colloidal Silica filler (for thickened paste) — one small can
- WEST SYSTEM 410 Microlight filler (for fairing) — one small can
- Mixing cups, stir sticks, disposable chip brushes (1" and 2"), bubble-buster roller
- Acetone — 1 quart minimum
- Sandpaper: 40 grit, 80 grit, 120 grit, 220 grit, 320 grit
- Angle grinder with 40-grit flap disc (you likely have this)
- Dremel or die grinder with carbide tip for opening the crack (optional but helpful)
- 2-part polyurethane marine paint (Interlux Brightside or similar) in white — 1 quart
- Etching primer compatible with epoxy
- PPE: P100 half-mask respirator (not just a dust mask — the styrene/amine fumes are real), nitrile gloves, safety glasses, long sleeves
I have some of this already.
This is not going to be an easy thing. ![]()
Have you got a date in mind yet?
I am planning to go out to CRO on 7/3, and one thing I would like to do is take a fresh look at the dome in light of my research.
I did not get a chance to be part of the initial dome construction, so I want to take it step by step, and make sure I understand how the shutter system all really fits together and the pitfalls with disassembly/re-assembly.
I am probably over-thinking it right now, but for sure I don’t want to make things worse. ![]()
I have a portable air compressor, 2 steel saw horses, 2 plastic saw horses, may not be strong enough, climbing ropes, 10 & 11 mm, several carabeaners and screw links, latex and rubber gloves.
A post was merged into an existing topic: Mowing dates, maintenance history & volunteer training